DIY Instructions - How to install underground drippers
All you need to know about installing underground drippers...
The best way you can get your head around how to install sub-surface drippers for your lawn is to watch the following video.
Installing underground drippers for your lawn
(These instructions are best read in conjunction with watching the above video)
There are 5 main elements to any sub-surface system, those being:
- A pressure reducer - Most dripper pipe has a maximum operating pressure. The best way to protect the pipe from being damaged by high pressure is to install a pressure reducer.
- A mainline - A mainline is essentially a length of poly pipe that typically runs from the water source/tap and then goes around the outside of the lawn area. This pipe carries the water from the tap to the drip pipe.
- The drip lines - Inline drip pipe has a dripper built into it about every 300mm. Make sure you buy drip pipe that has been specially designed to be buried and one that preferably won't allow lawn roots to grow in the drippers.
- A flush tap - This is a tap that is positioned at the end of the mainline that allows you to flush the system out if it gets blocked.
- An air release valve - This valve prevents the drip pipe from sucking in dirt through the drippers.
Design your system
Every drip system needs to be planned and designed first for maximum efficiency. Use our DIY irrigation planner tool to plan your watering system.
From here we will provide you with an easy to follow design and set of instructions. Sub Surface drip systems are easy to install - even if you haven't had much irrigation experience.
Step 1 - Install a pressure reducer.
This is usually screwed onto the tap or solenoid valve to regulate the water pressure and protect the drippers. This is essential.
Step 2 - Install a mainline.
This is shown by the black pipe in the photo below. We use 25mm poly pipe for this element. It's much easier to work with than 19mm pipe, especially when it comes to attaching take-off adapters (the fittings that connect the drip pipe to the mainline.) The mainline goes from the water source right around the outside of the job.
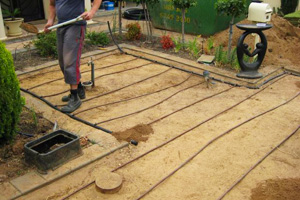
Step 3 - Install the drip lines
At an interval between 300 and 400mm (depending on your soil type), install straight lines of drip pipe as shown in the photo. Drip pipes should be installed around 100mm below the soil surface.
Step 4 - Install a flushing tap
At the end of the mainline, install a flushing tap. This is typically a barbed, inline tap. When opened it allows you to flush the system out. This helps keep it clean and also helps clear any obstructions.
Step 5 - install an air release valve
At the high point of the job, install an air release valve in the mainline.
Step 6 - Test the system
Turn the system on for a few minutes to make sure there are no leaks before filling it over with topsoil.